Posts

Showing posts from October, 2012

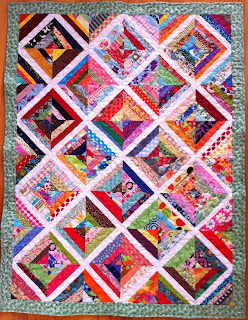
One Block Wonder Finished

Image
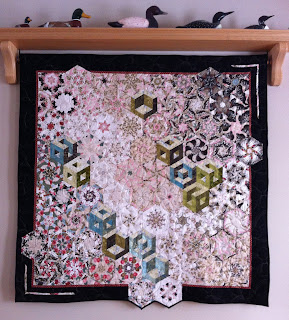
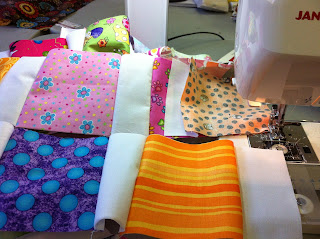
Some quilts are completed quickly and others need time to percolate and age before they are finished. This one block wonder quilt was one that needed time. I rarely take classes, preferring to spend my $ on fabric than techniques I can learn online or through a book. My local quilt store, Along Came Quilting offered this class a few years ago and I loved the sample and signed up! The first part of constructing this quilt was the hexagons that are made from little triangles. 6 layers of fabric were layered so that the pattern was matched on all 6 layers. With a new blade in the rotary cutter, strips were cut and then triangles and each set of six identical pieces were pinned together so they wouldn't get mixed up. The second part was the 3-D blocks that are set into the background of kaleidoscope hexagons. These were fun to make, but difficult to incorporate into the background. There was a lot of playing with pieces on the design wall to come up with a final design that w

String Piecing Mug Rugs

Image
I am a scrap fabric hoarder saver and this past week I took out my string fabric scraps. Strips of fabric that are larger than 3/4" and smaller than 2" are perfect for string quilts. I used some of my scraps up last year in this quilt that was made with a blocks from my online quilting friends: Scrappy strings Baby Quilt But I still have quite a few left and thought I'd use them for some craft sale projects. First thing I did was separate the strips by colour Scrappy Strings ready to sew  And on a piece of batting that was about 7"x9", I started sewing strips down, quilting as I went. The first strip goes on right side up and then the next strip right sides down on top of the first strip, lining up the edges. Sew a 1/4" seam and press open. Repeat on both sides of the first strip until the batting is covered. Adding string scraps to batting Trim square - I trimmed mine to 6.5"x8.5". Add backing fabric and bind as you would a normal

And the Winner is. . .

Image
23 comments, 44 blog followers and 93 Facebook likers that aren't related for 160 entries! Thanks so much for all your encouragement and comments - I really appreciate each and every one of you and enjoy giving something away to show that appreciation. I made a list, checked it twice and gave every comment a number, every blog follower a number and every Facebook liker a number! Then I went over to Random.org to generate a random number and this is what showed up: Back to my lists and the winner is: Congratulations Zita! I will be in touch with you to see where I can send your prize! Thanks everyone! I hope we can do this again real soon! --Ann Edited November 5, 2012 to add: If Zita does not contact me by the end of the day, Wednesday, November 7, I will be drawing a new number for a new winner!

Tutorial - Placemats and Napkins

Image
If you haven't entered to win the fall placemat and napkin set that will be given away on October 25, 2012 - click here and enter a comment . And if you want to make your own set, here's the how-to: PLACEMAT AND NAPKINS Materials Needed for 1 placemat and 1 napkin: .5 yard (meter) Fabric A (front) .5 yard (meter) Fabric B (border and backing fabric) low loft batting 16"x20" (40.5cm x 51cm) From Fabric B, cut 1x 18.5"x22" rectangle (placemat) From Fabric B, cut 1x 18.5"x18.5" square (napkin) Iron under 1/2" on all 4 sides on both pieces of Fabric B.  Mark a point 3" (napkins, use 2") from each corner and draw a line joining the points. Fold the corner in half right sides together and stitch along the drawn line, repeat on the other 3 corners. Trim seams to 3/8", turn right sides out and press. This is the backing and the mitred border all done in one step! Cut batting and Fabric A 3/16" s

Shop Local - Stone Willow Jewellery

Image
Nicole from Stone Willow Jewellery has a distinct and elegant style. Her pieces are simple and timeless and there is something in her collection for every taste and style. Simple Beauty Earrings 1. Please introduce yourself and tell us a little about how you started creating. Hi, I'm Nicole of Stone Willow.  What you would normally expect from a jewellery designer would be someone who is always dressed to the nines, hair and makeup done,  pushing sales upon everyone who walks by.  This is definitely not me.  You may catch me out hiking.  More than likely,  I’d be wearing a bandana so I didn’t have to style my hair.  Make-up?  Only a little on a big show day.  I love outdoors,  I love all things natural, I yearn for a peaceful co-existence with nature.   Most of all, I am obsessed with creating beautiful things just for you. I had left my career after years of juggling family life and work responsibilities.  We wanted a better family life and decided that I would stay at home

WIP Wednesday - October 17

Image
Just thought I'd pop in and let you see what I've been working on the past couple days - it sure feels like Santa's workshop with all these lovely Christmas fabrics! --Ann Linking up with: Quiltsy WIP Wednesday #32 Needle and Thread Network WIP Wednesday #61 Freshly Pieced

Tutorial - Fabric Basket

Image
A year or so ago, my friend Marie taught me how to make these unique little fabric baskets. This is a perfect project for those fat quarters that you love, but don't want to cut into little pieces for a quilt! I'm making mine today with some Halloween themed fat quarters I won from Monika at Quiltlover from her Facebook page . I hope she likes what I decided to do with her fabrics! Fabric Basket - FOR SALE FABRIC BASKETS Material list: 2 coordinating fat quarters (Fabric A-outside, Fabric B-inside) 1 piece batting 12.5" square 4 buttons basic sewing supplies This project involves hand sewing - I'm sure after making a few of these, a sewing maven could figure out a few machine short-cuts! My green fabric with the black cats is Fabric A, and my Fabric B is purple. Click on any of the pictures for a close-up! Layer your fat quarters on top of each other on your cutting board and cut a 12.5" square - or you can cut each one separately - it's entir

WIP Wednesday & Give Away - October 10

Image
After a slow start to the week last week, I did get a lot accomplished. I have a few custom orders that came in from my online Etsy shop, so that will definitely be keeping me busy over the next little while. And I found this Christmas stocking in the back of my closet, where it's been lurking since last November! I love the look of the crazy patches with the gold stitching and I will be adding my name to it and using it for my stocking this year! This was such a fun project and a huge thank you to Joanne for taking the time to teach us how to put these Christmas stockings together. Crazy Patch Christmas Stocking Potholders Potholders Potholders are such a great way to use up unique bits of fabric and small pieces of quilt batt that are left over from other larger quilting projects. I've added a few more to my Etsy shop this week and used up this awesome fabric that is so perfect for these little kitchen helpers. GIVE AWAY TIME! I'm coming up to my 2nd

Zucchini Salsa

Image
I'm still putting away the last of my garden produce and with tomatoes ripening daily and zucchini lingering in my fridge, I searched online for a great salsa recipe that would use both of them up. I found a simple recipe at Food.com for zucchini salsa and canned a few jars. It's a little sweet and very mild, so if you like your salsa hot and tangy, just reduce the sugar a bit and add some hot peppers. We had a great Thanksgiving feast with all the kids and grandkids home and when a little person asked for a story, well, how could I refuse? Happy Thanksgiving! --Ann

Quilt Retreat

Image
It's been a sluggish Monday morning for me - but that's pretty normal after spending a weekend quilting with friends at a quilt retreat. From mid-afternoon Friday to mid-day Sunday, we had no responsibilities and could sew to our hearts content. I'm just sorry I didn't take more photos to share with you! Penny's quilt in progress  I did some sewing on my sweet grand-daughter's quilt. The layout will not be the Sudoko-style layout I showed you earlier, but I think this one will be a little calmer with a little more white through the quilt. Plan C - pattern by Carrie Nelson  This pattern is one that I marked off to try from Carrie Nelson's book "Schnibbles times Two". The pattern is called Plan C and this is the smaller version of the quilt. I had some coordinating fat quarters I had picked up at a quilt show earlier this year and used them rather than the 5" charm squares called for in the quilt pattern. Triple Irish Chain - FOR SA